- Intro
- Creating a new repository
- Authentication
- Cloning a repository
- Making a commit
- Revert changes
- Push / pull commits to a remote repository
- Update
- Shelving changes
- Branches
- Graft / Transplant
- Merging / handling conflicts
- Annotating files (Blame)
- Identifying commits
- Tags
- Settings file / enabling extensions
- Pull requests
- Linking commits to online issues / changesets
Intro
Here is a guide on how to use TortoiseHg. This guide mostly contains things you’ll probably pick up after just a few days working with TortoiseHg, but it also contains tips I didn’t learn until much later. For those new to Hg from a SVN background basically in Hg the entire repository is located in your working folder so commit and update happens in your own copy of the repository. When you’re ready you can push one or more commits to a central repository other developers also work with, or pull new commits from the central repository to your local repository. You also have the option of push/pull from a different repository as well.
While a number of things can be done via context menus in file explorer, this guide will be focused on doing everything inside TortoiseHg Workbench. Also to learn the Hg commands for all these steps you can open View > Show Console and see what was run when you performed the step in the GUI, you can also just enter Hg commands here if that’s faster.
Creating a new repository
While you can create a repository on you local machine by File > New Repository and even serve it up over HTTP by Repository > Web Server, it is recommended to use an online source hosting servce. This is because an online service provides better backup protection in case something happens to your machine and makes it easier to share your repository with others since you’re not having to maintain your own server. The two most popular ones are bitbucket and github and both offer free plans, bitbucket is great because it supports Hg as well as Git but github only supports Git so you’ll need to use the hggit extension, see using tortoisehg with git for details.
https://bitbucket.org/plans
https://github.com/pricing
Authentication
HTTP/S
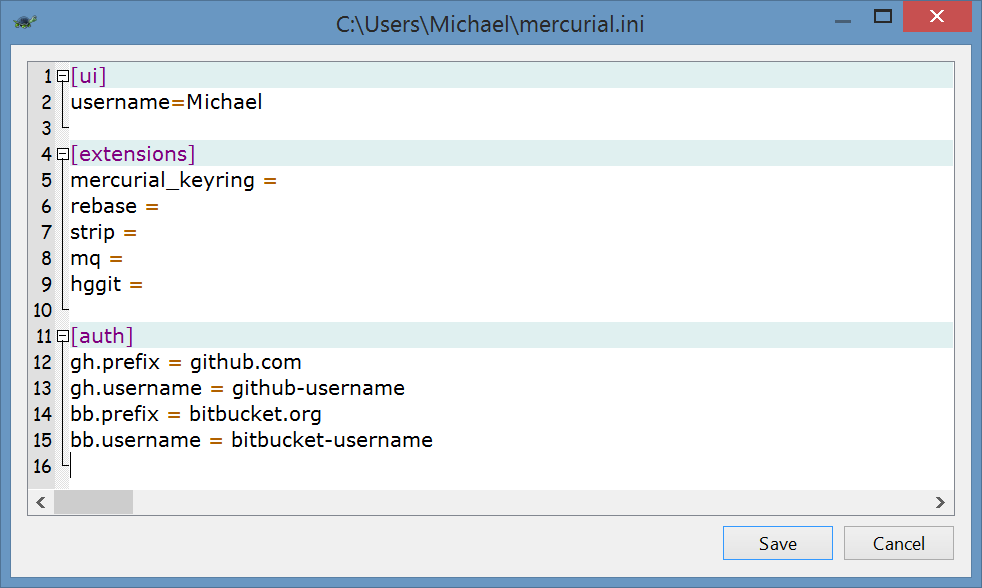
HTTP/S auth will work straight away prompting you for username or password every time you do a push or pull. In order to save the credentials the recommended approach is to enable the mercurial_keyring extension to securely store the password (see Settings file / enabling extensions on how to do this). Once enabled as long as you specify the username either in the repository url https://username@domain.com/repo (hggit doesn’t support this) or in the settings files:
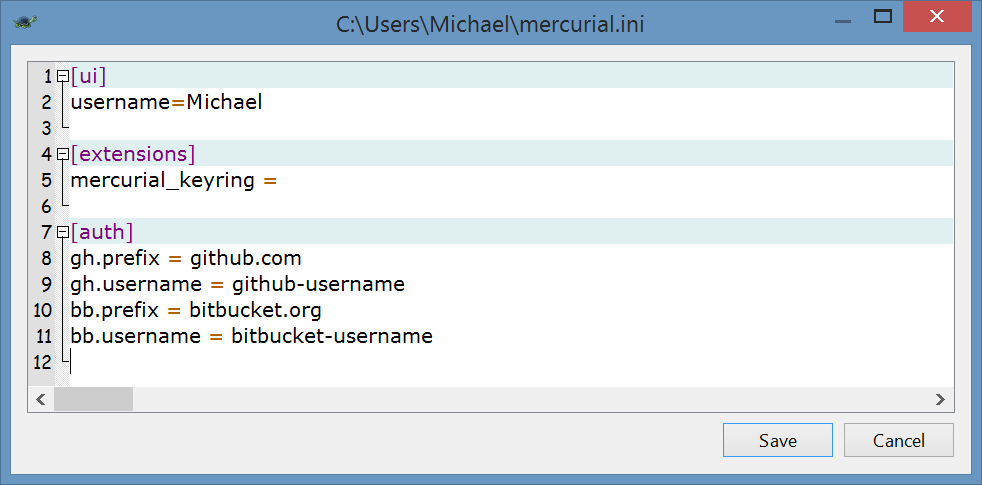
Then the next time you do a push or pull you will only be prompted for password and this will automatically be saved for future use. How the settings file works is gh or bb can be anything and is just a way to group the auth settings together. If the prefix matches part of the repository url then the specified username will be used. The password can also be defined here in the settings file but then it’s being stored in plain text in a known location which is less secure than using mercurial_keyring.
While mercurial_keyring extension is available under Windows, under Linux you will have to install it first before it will appear under TortoiseHg extensions that you can enable:
1 | easy_install keyring |
SSH
Here is a guide you can follow to setup SSH on Windows:
https://confluence.atlassian.com/display/BITBUCKET/Set+up+SSH+for+Mercurial
Linux SSH guide:
https://confluence.atlassian.com/pages/viewpage.action?pageId=271943168
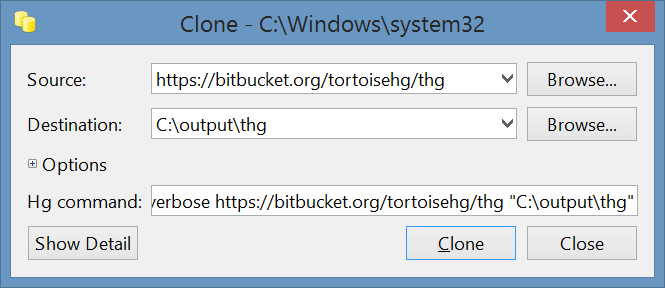
Cloning a repository
File > Clone repository
Making a commit
In order to commit you must either select the working directory in the commit history or click the commit icon (green tick) in the top toolbar. To make a commit tick the files you want to include, type a commit message and click the commit button:
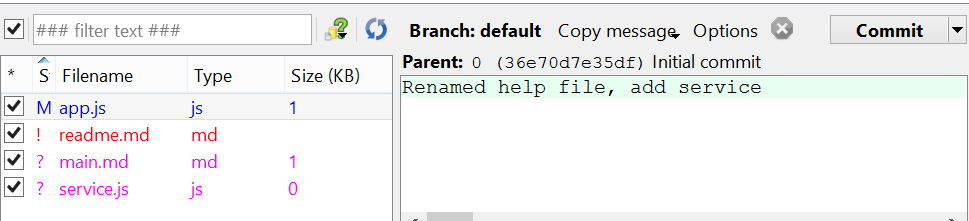
Note if it’s a new file that was unversioned you will be prompted to add untracked files. You can right click the file and select Add file before clicking the commit button if you want, but it will still only be included as part of the commit if you have ticked the first.
The file list only shows changes so if you don’t see the change you want to commit just click the refresh button just above the file list.
Specifying username
If you click options just above the commit message window, you should see this dialog:
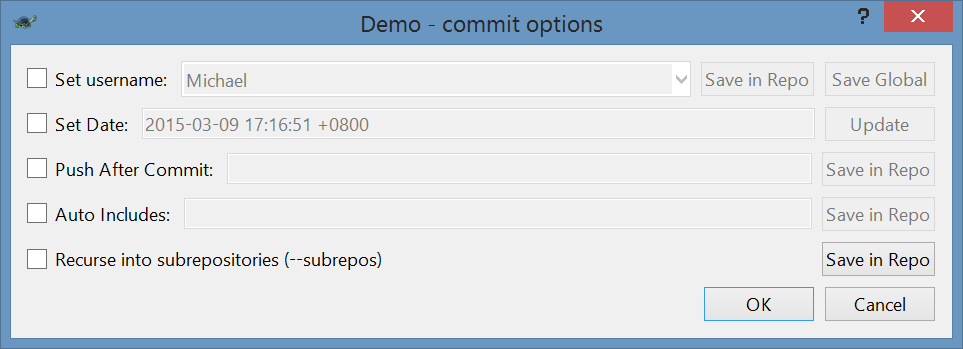
There you can specify the username, and optionally save this either in your settings file for the local repository or the global settings file for future commits. Note if you use your github or bitbucket login email address the username on the commit online will appear linked to your account, if you want to keep your email address private for github you can use Display Name <username@users.noreply.github.com> and for bitbucket under settings on the website for the repository you can map names to user accounts.
Commit chunks
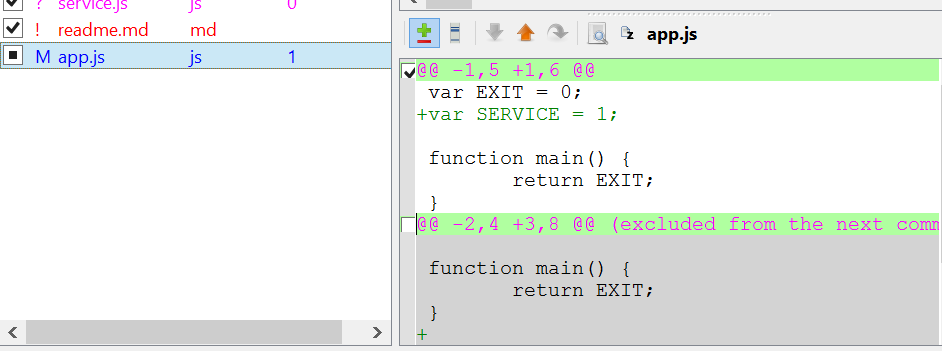
To commit only parts of a changed file, click the file in the file list then on the right hand side you can see a list of the changes, in that window you can tick what changes you want to include in the commit:
Rename files
To handle renaming of files in order to keep file history, you can either right click on the renamed file and select Was renamed from > original filename. Or you can use the detect renames dialog by right clicking on any file and selecting Detect renames:
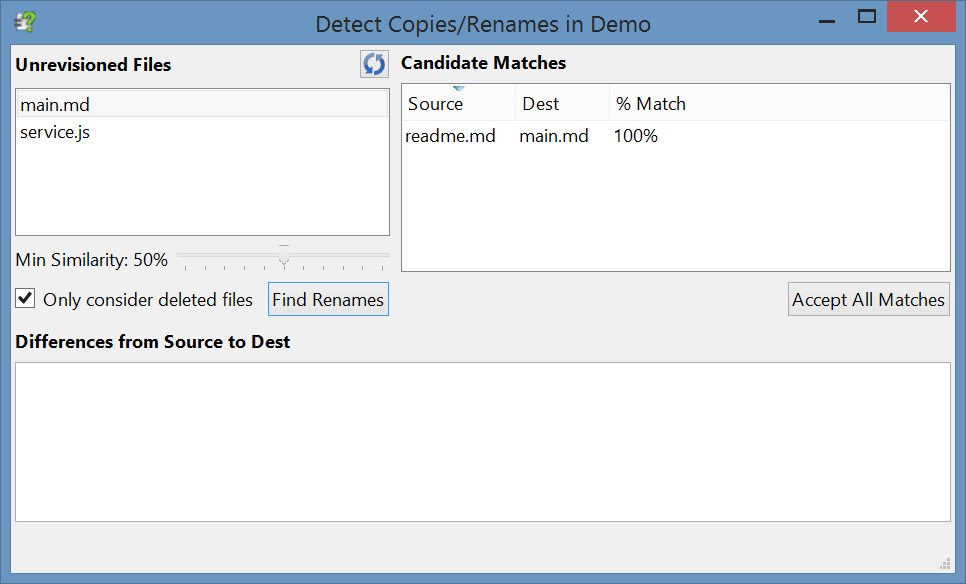
Under unversioned files, select the file that was renamed and click find renames, you can lower the Min Similarity setting if the renamed file has been changed and a match was not found. Once a match has been found you can click on Accept all matches or if multiple matches are found select the correct match under candidate matches and click on Accept selected matches. Note this can also be useful when splitting a file in two but you want the same file history for both files before the split, in this case just untick Only consider deleted files before attempting to find a match. If you struggle to find a match you can undo the rename and then in file explorer rename the file by right clicking and selecting TortoiseHg > Rename file.
Deleting files
You can just tick the deleted file and when you click the commit button you will be prompted to remove selected deleted files. If you right click the file in the file list you don’t see an option to delete file just Forget file. What forget means is remove the file from source control but not actually delete it from the file system. In file explorer the is an option called Remove file that will both forget the file from source control as well as delete the file from the file system.
Ignoring files
If there a untracked files in the file list you want to ignore right click on one of those files and click Ignore files.
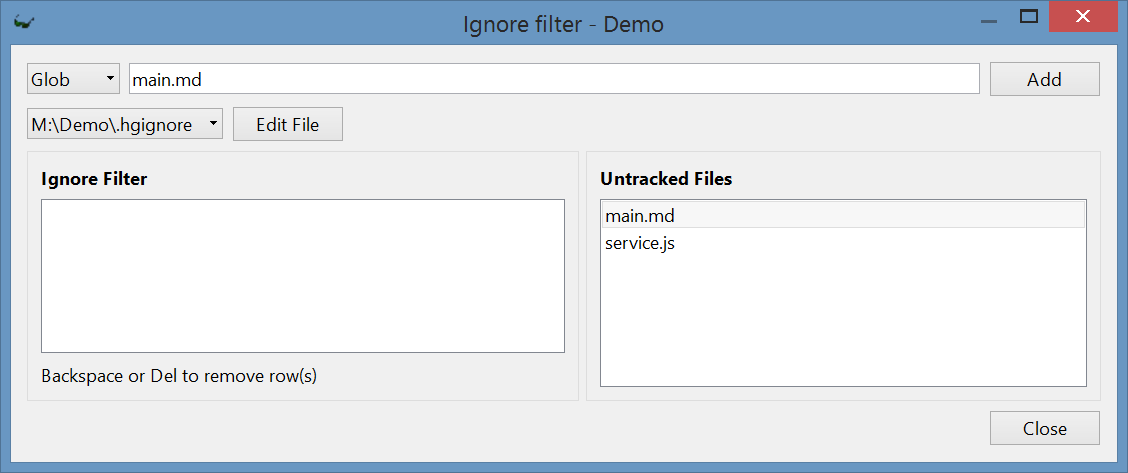
At the top you can select what kind of syntax you want to use glob or regexp, then specify the filter and click add. The filter should now appear in the left column, and the current list of untracked files not ignored should appear in the right hand side so you can see straight if your filter worked as expected or not. You can also click on an untracked file to prefill the filter textbox with the filename ready to create a new filter.
Note this creates a .hgingore file which you can add to source control. If you want to have a second .hgignore file that you don’t want to add to source control you can add this to your settings file:
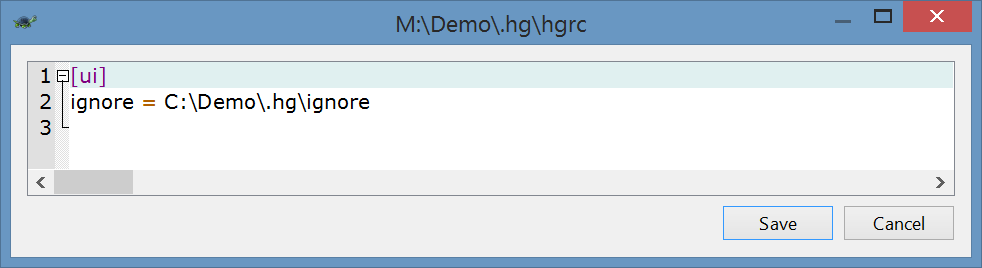
Then in the ignore dialog you can click the dropdown to switch between ignore files. You can locate this ignore file anywhere you like some like to locate it under the .hg folder and some just at the root of their repository and then add the filename to itself to ignore.
Viewing a diff
In the file list of changes you can right click the file and select Diff to Parent to view the changes in KDiff3.
Revert changes
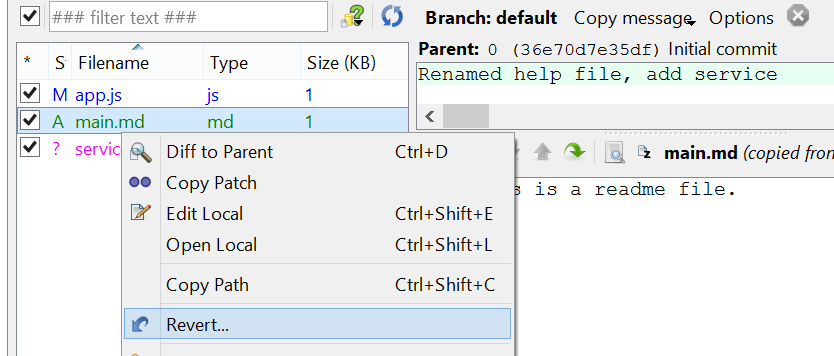
If you want to revert changes that have been made. In the file list just right click on the file and select Revert. If you only want to revert some of the changes see shelving changes where you can shelve the bits you want to keep, then you can revert file, then you can restore the shelved changes.
If you revert an added file, it just becomes untracked so delete file you need to right click file and select Delete Unversioned. If you revert a missing or file it will be restored.
Push / pull commits to a remote repository
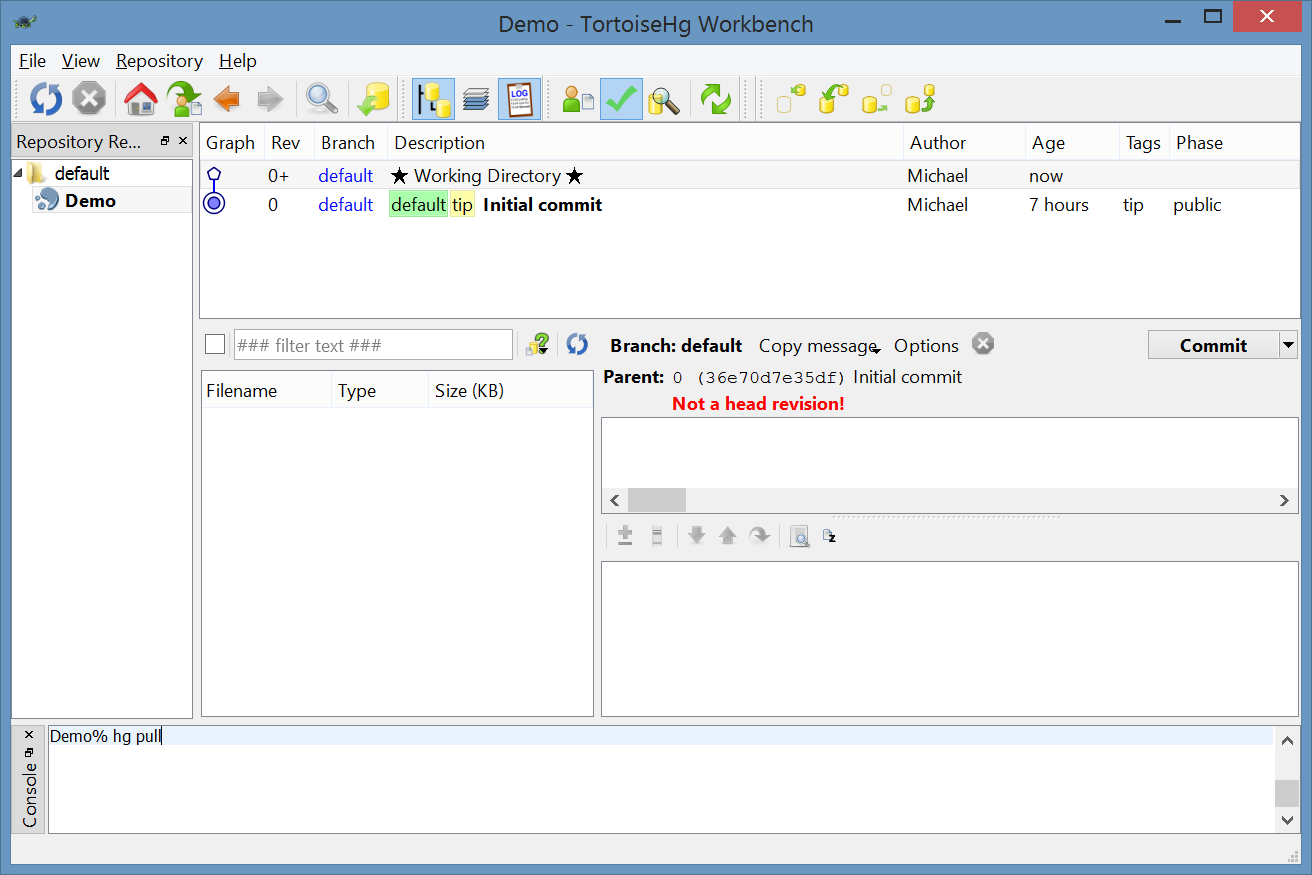
After commiting changes to your local repository you need to push those commits to a remote repository. At the right hand side of the toolbar at the top there are buttons for performing a push or pull, and also buttons to preview what will be pushed or pulled.

Now when you attempt to push you may see this error:
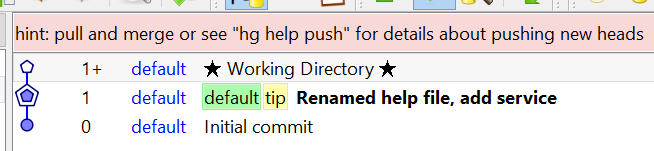
This basically means there are new commits on the remote repository you need to pull first before you can push, after pulling you will see something like this in your history graph:

Now if you try to push you will get an error because there are now two heads to this branch when there can only be one. There are two approaches, you can either merge:
Or you can rebase:

Rebase is nice in that it keeps the history linear which makes it easier to follow so tends to be the preferred approach. Now that you have one head you are now ready to push.
Update
The idea of update is to update your working directory to a particular version in your source control history. This can be done by right clicking on the commit in commit history you want to update to and selecting Update from the context menu. If you have local uncommitted changes you may be prompted to either discard or shelve those changes.
Shelving changes
The idea of shelving changes is to temporarily move changes made to your working directory in another location so they can be restored later. To open the shelve tool select the working directory in commit history and then click this icon just below the commit message window:
![]()
Now you should see this:
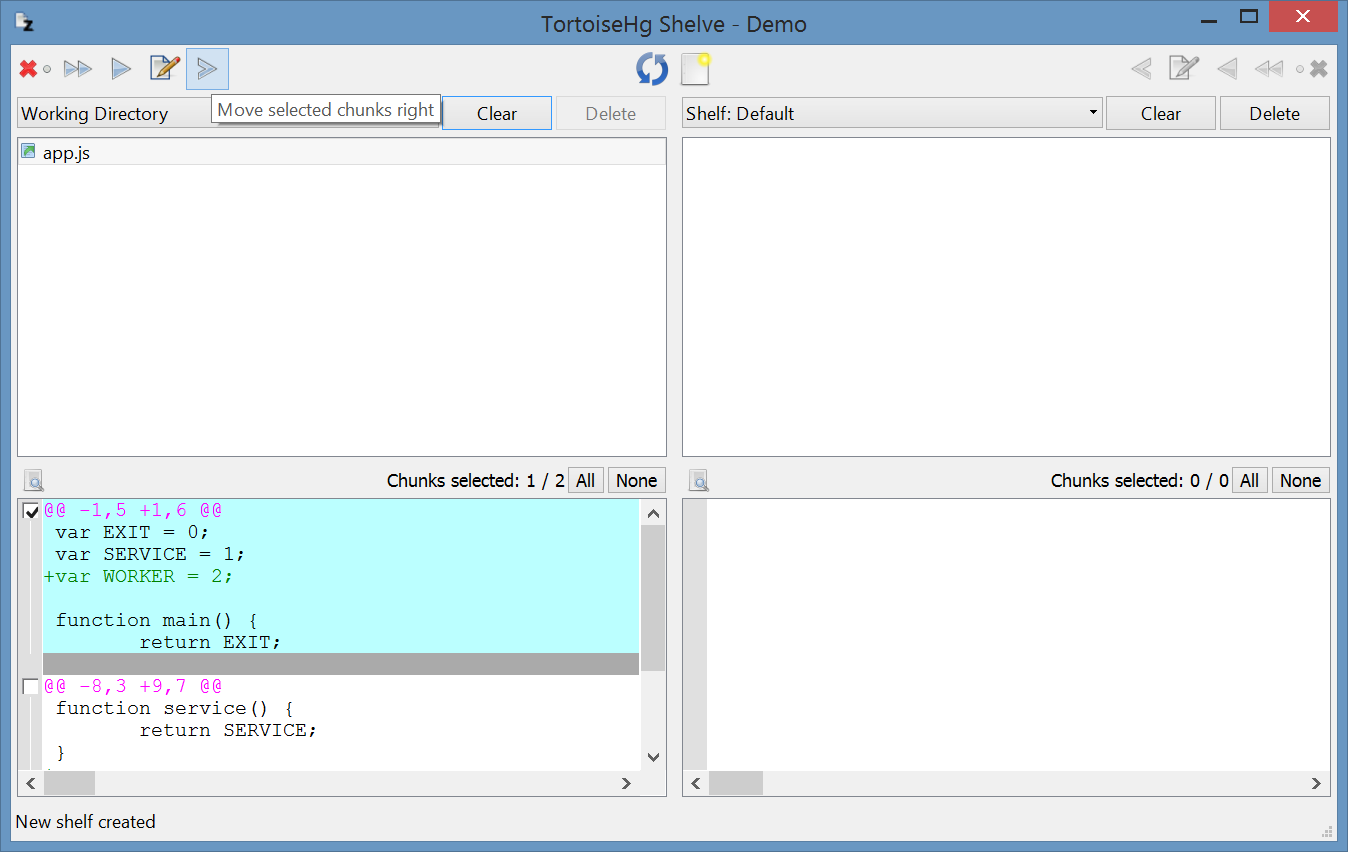
On the left column you should see a list of changes in the working directory. On the right column you should see a list of changes in the shelf I’ve called Default. Before you can start moving changes across you will need to create a new shelf by clicking the icon just above the shelf dropdown on the left side of the right column. You can now click the Move all files or Move selected files icons at the top to move file changes between the working directory and the shelf. You can even select parts of a file change by selecting the file and then ticking underneath what chunks you want to copy and then clicking the Move selected chunks button as illustrated in the image above.
Note you can create more than one shelf, and even select a shelf in the dropdown in the left column to move changes between shelves. Clear just empties the shelf or working directory of all changes, and delete will delete the shelf.
Handling conflicts
Sometimes if when you try to restore changes you have shelved to your working directory you may see this:
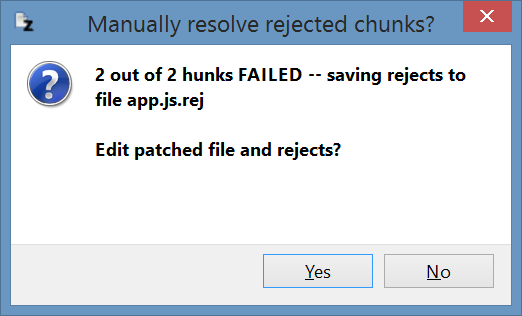
When you yes you will see something like this:

How this dialog works is in top box it shows the current file in the working directory which you can edit here. Underneath are two columns, the first column is a list of the changes or chunks for the file that are in the shelf, the second column shows what the change is for the selected chunk.
The idea here is that you manually apply the change for the selected chunk to the top box and then click the green tick between the two columns to say it’s resolved before proceeding to the next chunk. When you have finished you click save.
Branches
To create a new branch, click the branch label just above the commit message window:
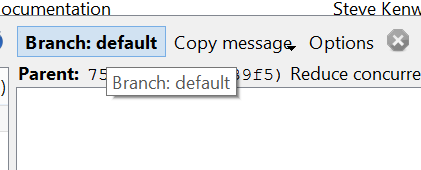
And you should see this:
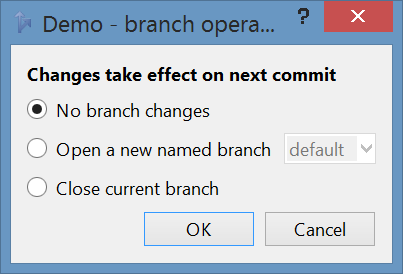
From here you can create new branches or close existing branches, this change happens once you have completed the commit. Note you filter the commit history to only show commits for a specified branch, first select the Filter graph with revision sets icon from the toolbar at the top. When the filter toolbar appears you can select the branch you want from the dropdown on the right hand side.

Merging / handling conflicts
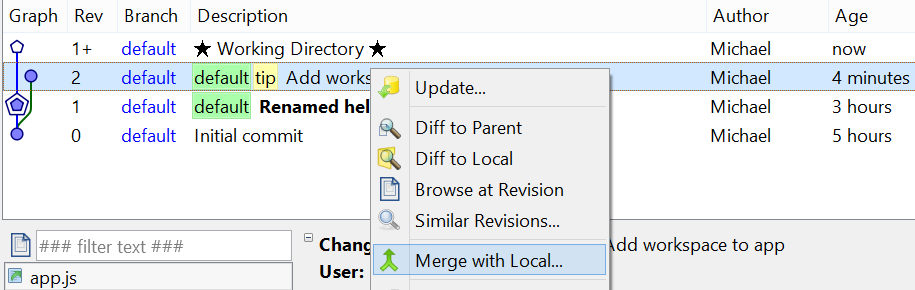
When you want to merge between branches update to the branch you want to merge the changes into by selecting the latest commit then right click and select Update. If you are merging between two heads of the same branch then it doesn’t matter which head you pick to update to. Then you select the head of the other branch and then right click and select Merge with Local like below:
You will see a dialog called Prepare to merge here you may need to discard or shelve local uncomitted changes before continuing then click next. If on the next screen you see this:
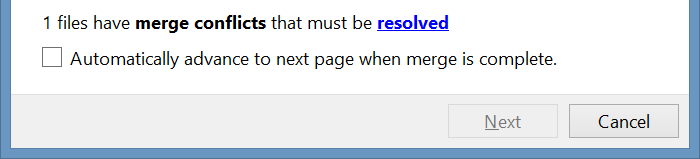
You have merge conflicts that need resolving, to resolve click the highlighted word Resolve and you should see this:
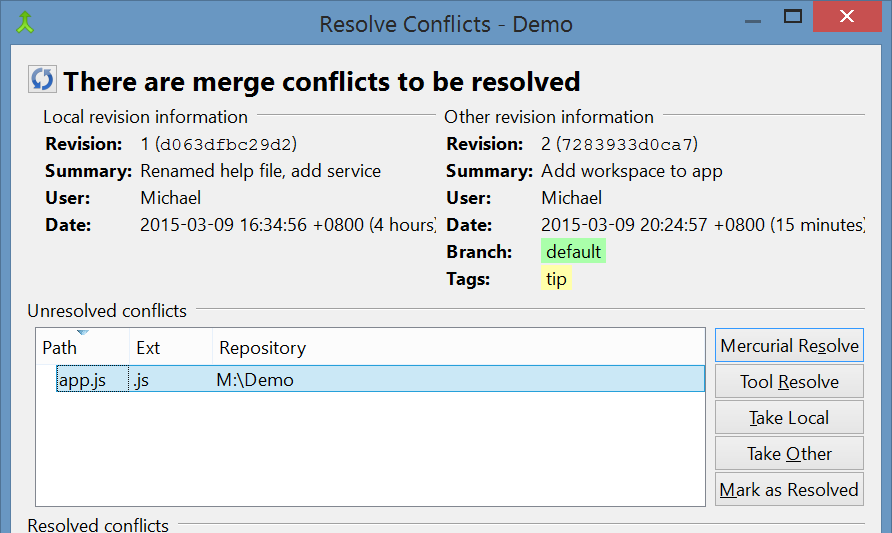
Here there are five options:
- Mercurial Resolve - allow mercurial to attempt to automatically resolve the conflict for example if the changes are located in different parts of the file then this should work
- Tool Resolve - this also attempts to automatically resolve using the configured diff tool instead (by default KDiff3) and if this fails will show a dialog where you can manually resolve the dialog
- Take Local - chooses the file from the branch/head that you updated to over the one you merging from
- Take Other - chooses the file from the branch/head that you are merging from over the one you have updated to
- Mark as Resolved - at this point you can open the file in conflict from the working directory and manually resolve it in a text editor, when you’re finished you can come back to this dialog and select mark as resolved
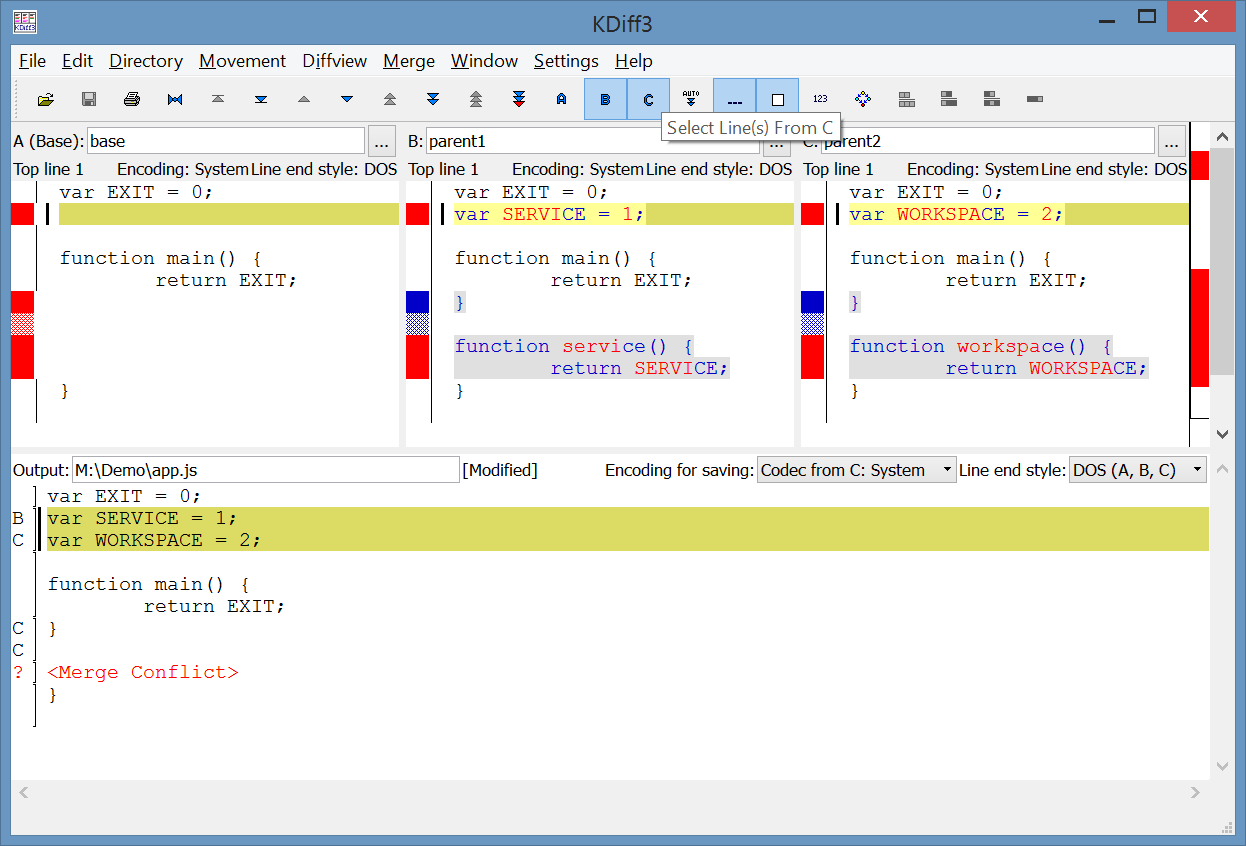
Usually you can just just select all the conflicted files and choose tool resolve, this is the dialog it shows (if using KDiff3) if there is a conflict on a particular line:
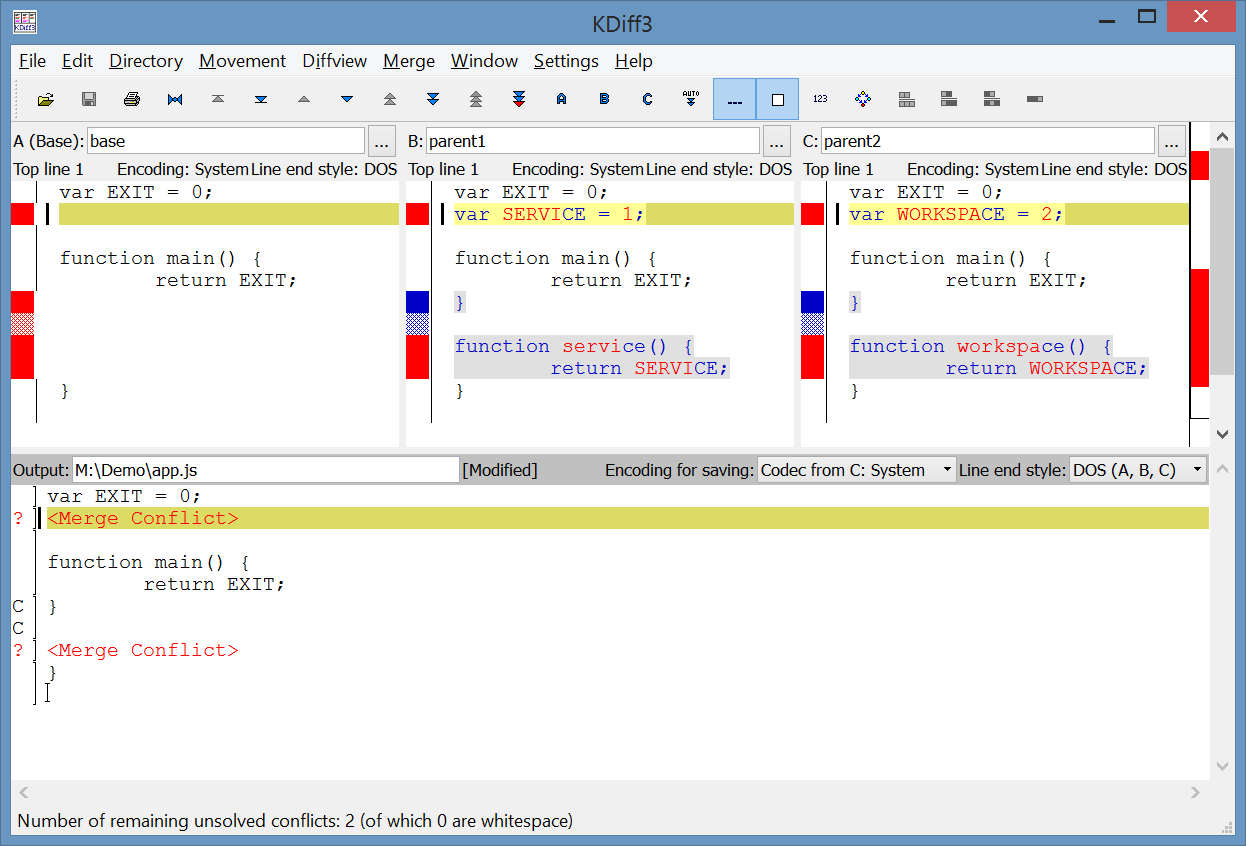
On the left column (A) is the common ancestor for both heads, in the middle column (B) you have the current head you have updated to, and on the right column (C) is the head you a merging from. And at the bottom shows the merged output, so here you can see the line that has caused the conflict.
So toolbar you can select what lines you want from A, B or C. In this case looking at the diff we see we probably want the lines from B and C as shown:
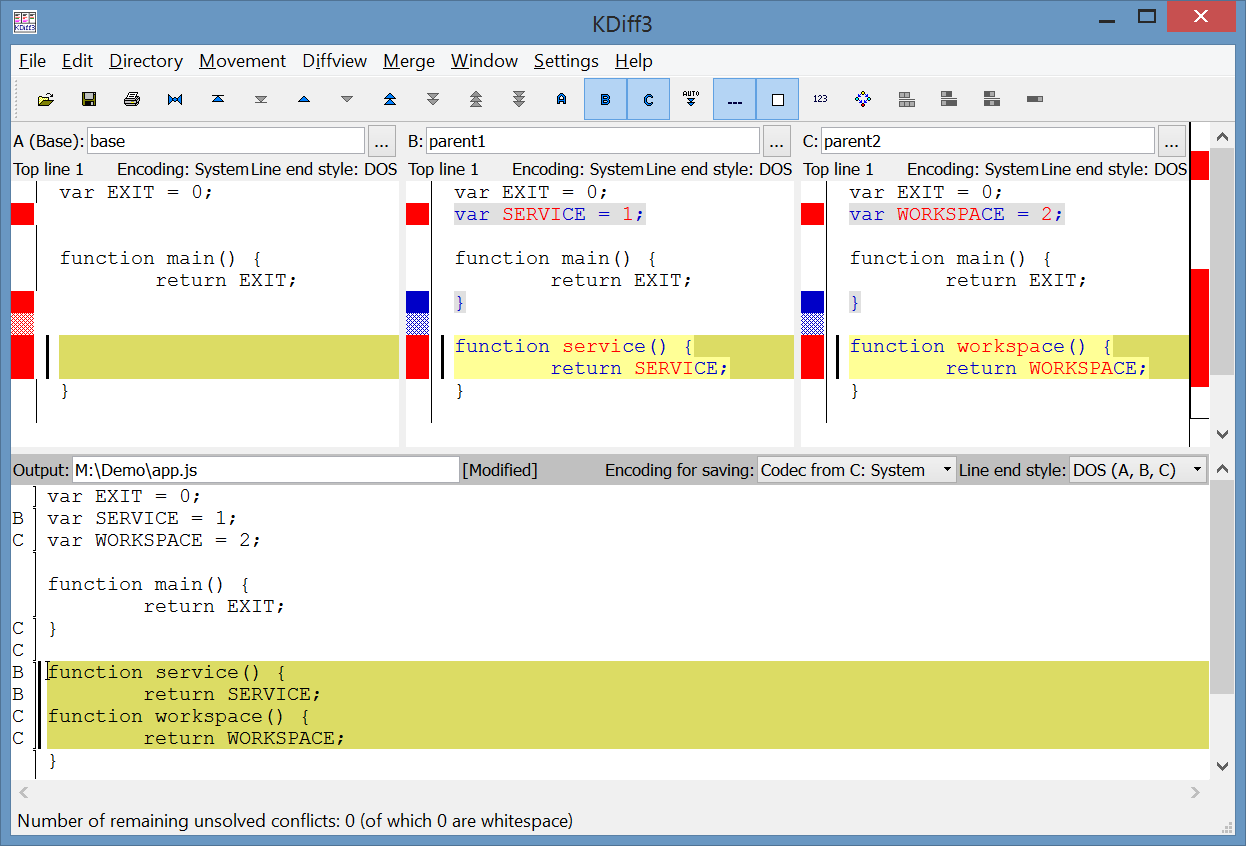
Now that the first conflict is resolved we can click the triple down arrow in the toolbar to proceed to the next conflict:

Now for this conflict we also want to pick the lines from B and C as shown. However here you can see that the output is invalid and needs to be manually fixed:
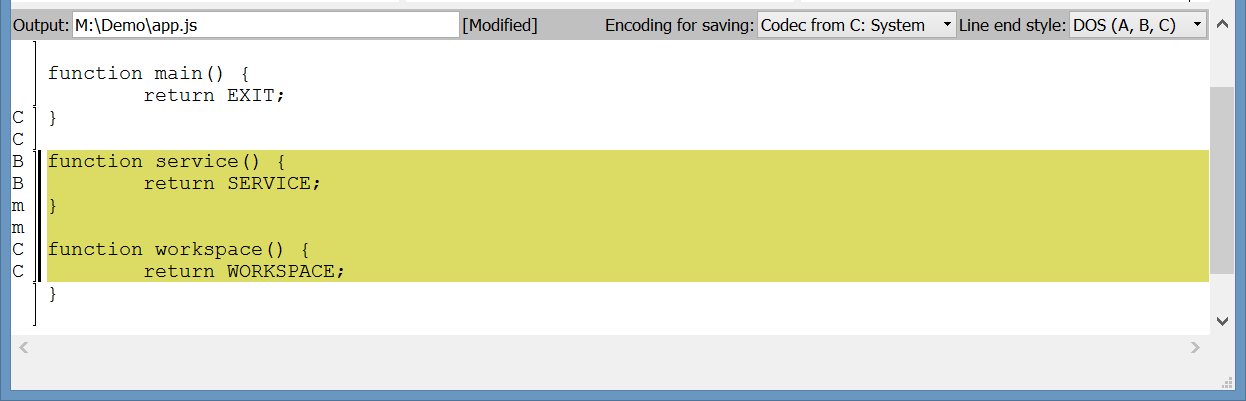
To fix the output window is editable so you can manually fix the conflict like below.
Once there are no more conflicts, the next conflict button is disabled, you can click save at the top and then close the window. Once all the conflicts are resolved you can close TortoiseHg’s resolve conflicts dialog and click next on the merge window. On this next screen you can enter the commit message and then click Commit Now. You are now done.
Graft / Transplant
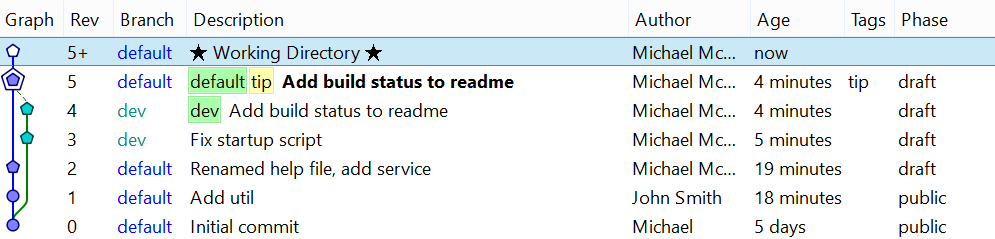
To use graft you will need to enable the transplant extension. Graft allows you to copy one commit from one branch to another. Take for example this scenario:

To copy the “Add build status to readme” commit to the default branch, we would first update to the default branch, then right click the commit we want to copy and select Graft to Local. You have now copied the commit:
Annotating files (Blame)
To look at the history of a file, simply right click on the file in the file list of changes and select File History / Annotate. If you do not see the file since it hasn’t changed you can either find it in file explorer or right click the working directory in the commit history and select Browse at Revision and then find the file there. Now you will see a dialog like this:
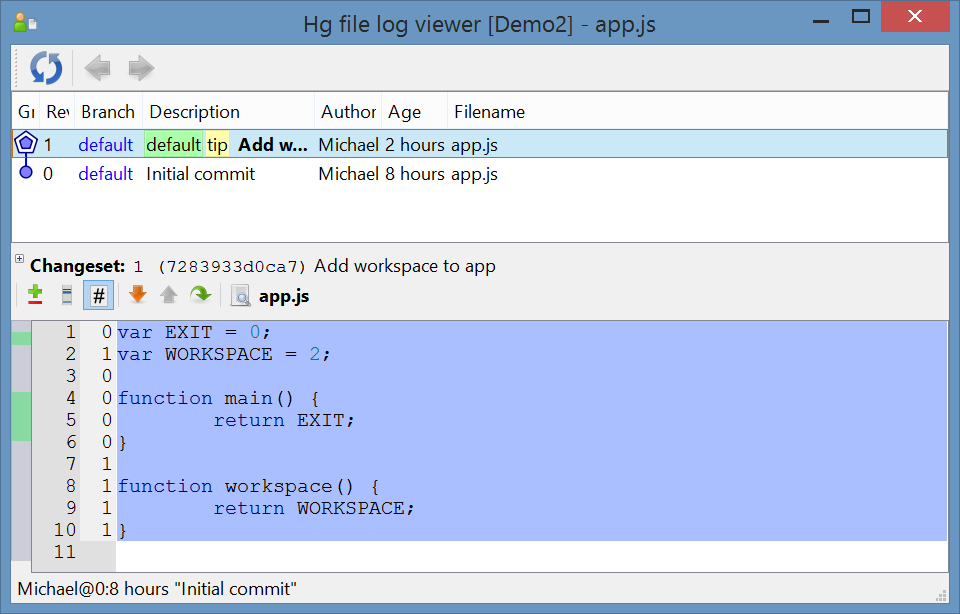
Here you can see a list of commits when the file was changed, which you can select to see what the changes were. At the top of the bottom box you can toggle between three different views, the first two allow you to switch between diff style views patch and inline (you can still right click the commit and select Diff to Parent to use a diffing tool like KDiff3). And the last view is called annotate which displays the whole file with the revision number on the left hand side of each line when that line was last changed, you can then hover over that line to see who made the commit and what the commit message was in the status bar.
Identifying commits
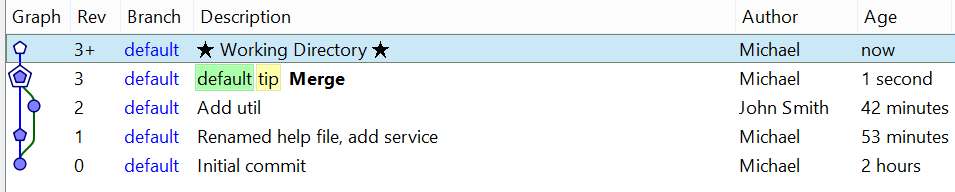
Note that the revision numbers you see in your commit history can be different to the revision numbers other developers see in their local repository. This is simply because the numbers are incremental in the order the commits are made on your local repository. For example if you made a commit and then pulled a new commit in and then merged before pushing your commit history will look like this:

While the other developer who made the new commit, after they pull your changes in his commit history will look like this:
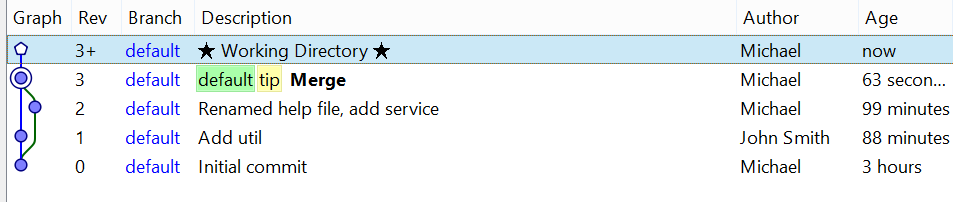
Instead the reliable way to identify a commit when working with other developers is by it’s hash, right click on a commit and select Copy Hash as this will be the same on both yours and other developers repositories. The purpose of the revision number is to simplify working with Hg from the console on your local repository where a revision number is much shorter and easier to remeber than a hash (you can use just the start of the hash as well), all commands accept either a hash or revision number.
Note if you use hggit then your local hash will be different to the remote repository’s commit hash since your local repository is mercurial and the remote repository is git and they both store commits in a different way hence the generated hash will be different. Not sure if it’s the same as other developers using hggit though.
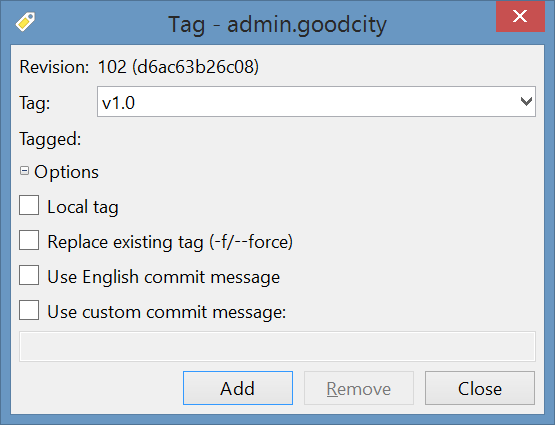
Tags
Tags are simply a label you can attach to a particular commit, this is stored in a .hgtags file at the root of your repository. These can be useful for things like tagging what commit relates to a particular version of your software that was released. When creating a tag under options you can specify local tag, this simply means the tag is only local to your repository and won’t get pushed to remote repositories, it does this by storing the tag information under .hg/localtags instead. The commit message options are because adding a tag automatically adds a commit for this change and you can customize what that commit message is or just use the default.
Settings file / enabling extensions
To open the main settings dialog right click on a repository and select Settings:
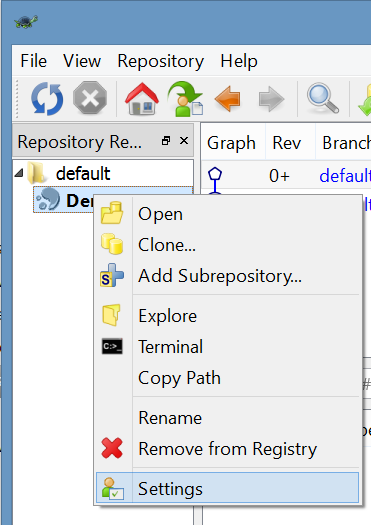
At the top of the settings dialog you will see two tabs, the first is global settings and here you can configure the default settings you want to use across all your repositories. The second tab is repository settings and these, which can override the global settings, only apply for the selected repository.
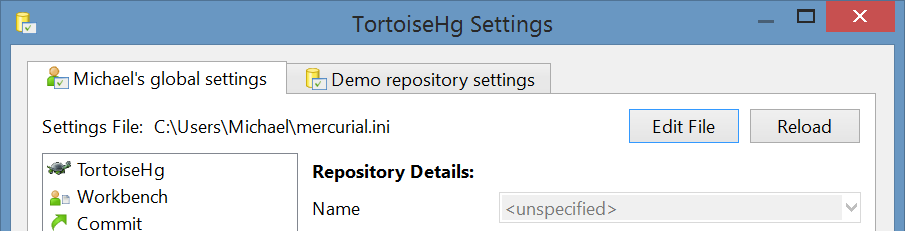
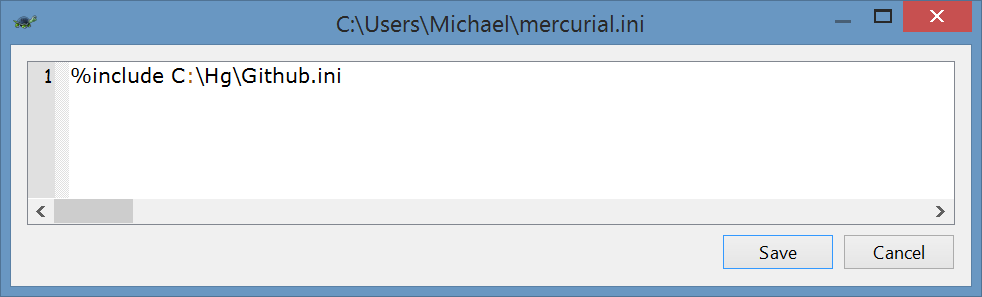
All settings changes made through the GUI are saved in the settings file allowing for easy restore and backup. It also allows you to enter settings directly in the file instead of through the GUI. To open just click Edit File located at the top, the file for the repository settings is separate to the file for the global settings.
To enable various extensions you can either enable them using the GUI:
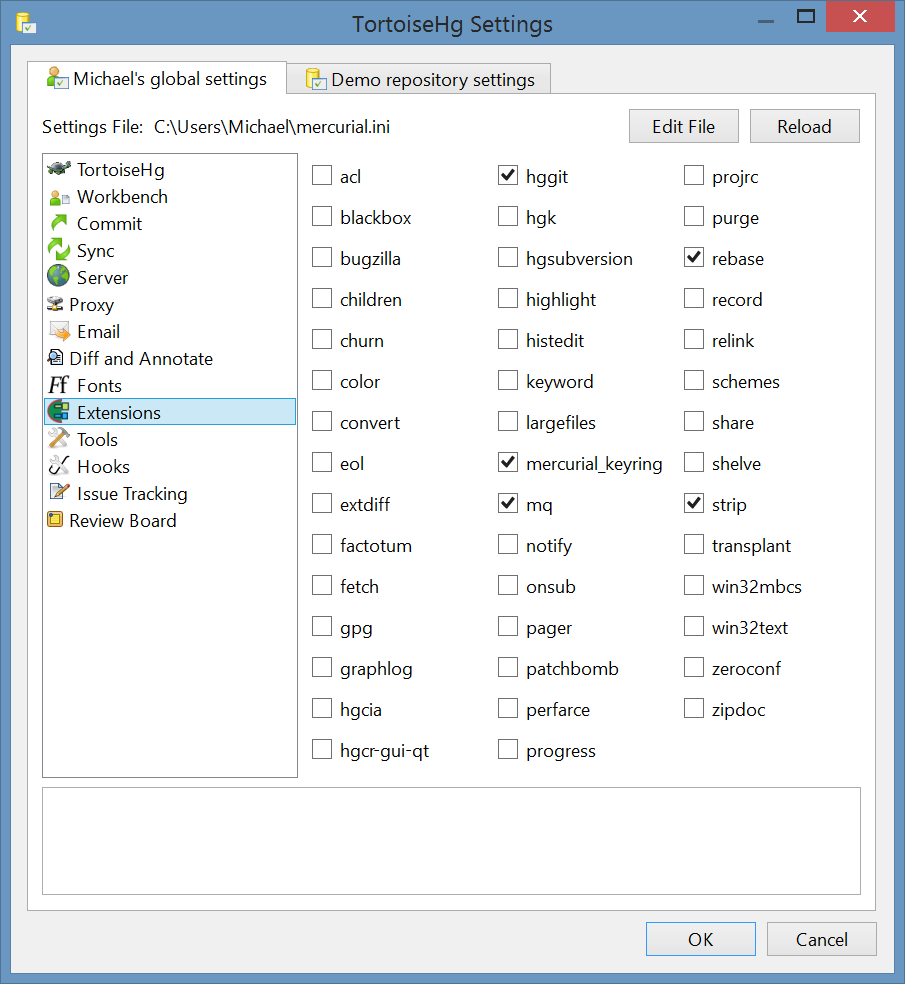
Or directly in the settings file.
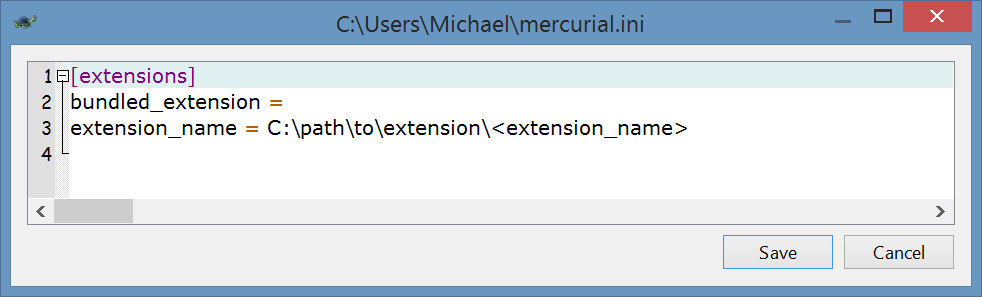
If you are installing an extension not bundled with TortoiseHg then you need to specify the file path. Usually this is done by cloning the repository and then providing the file path to the folder containing the file called __init__.py which maybe a subfolder in the repository.
If you want to share settings between repositories, but not with every repository which the global settings file does, then you can create a new settings file and import it in you repositories settings file like this:
Pull requests
And finally just a quick mention about pull requests or forking you may often seen mention. This is more related to services like Github or Bitbucket than TortoiseHg. The idea is if there is an open source project you’d like to contribute to but don’t have write access to, you would click the fork button on the repository’s webpage to make a copy of the repository under your account. You can then clone that repository to your local machine and commit changes that you push back up to the online forked repository. You can then click the create pull request button on your online forked repository that will appear on the original repository listing the new commits you have made. Here they can see the combined diff of all your commits and make comments on what they’d like to see changed before they accept it. They may want you to combine all the commits into one or change existing commits instead of making new ones, see here about how to do this by rewriting history. If they accept it, the pull request will be merged into the original repository and you have now contributed to an open source project.
Another usage is when working on your own repository in a team. Here you might create a branch to work on an issue, when you are ready you create a pull request that another developer reviews, if they accept it the pull request gets merged into the main branch and the issue branch can be closed.
Linking commits to online issues / changesets
It is possible for TortoiseHg to automatically turn issue numbers or planning story numbers into hyperlinks to the relevant webpage.
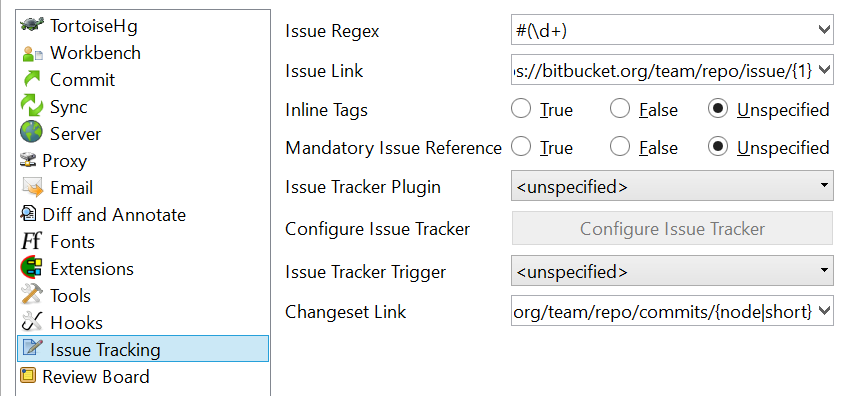
So here you could link to the github or bitbucket issue you’re fixing, in this example I’m linking any number prefixed with a ‘#’. But this could also be used for story planning cards like JIRA and you can make this mandatory so that you will be prevented from making a commit without one. You can also link the commits hash to the online view of the commit. Note you may need to restart TortoiseHg for these changes to take effect. Below you can see the changeset hash and issue number in the commit message turned into a hyperlink:
